# Vue
# Vue 核心 API&& 组件设计
- 官方推荐使用的引用组件的命名形式
// 推荐使用小写
import Cart from "./components/Cart"; <
cart > < /cart>;

// 中间添加 -
import HelloWorld from "./components/Cart"; <
hello - world > < /hello-world>;
- checkbox
<input type="checkbox" v-model="item.isActive" />
一定要遵守单项数据流
父组件的数据要在父组件进行修改
element-ui 已经被 vue-cli 纳入组件库
vue add element-ui 使用按需引入
  // src/plugins/element.js

  import Vue from "vue";
  import {
      Button,
      Form,
      FormItem,
      Input
  } from "element-ui";

  Vue.use(Button);
  Vue.use(Form);
  Vue.use(FormItem);
  Vue.use(Input);

  // src/main.js

  import "./plugins/element.js";
- element-ui form 表单的校验
  rules: {
      username: [{
              required: true,
              message: "请输入用户名"
          },
          {
              min: 6,
              max: 10,
              message: "请输入6~10的用户名"
          }
      ],
      password: [{
          required: true,
          message: "请输入密码"
      }]
  }
需要思考的问题
1、input 是自定义组件,它是怎么实现双向绑定?
2、FormItem 是怎么知道执行校验的,它是怎么知道 input 状态的?它是怎么获取对应数据模型的?
3、Form 是怎么进行全局校验的?它用什么办法把数据模型和校验规则传递给内部组件?
- 数据校验包
async-validator
- 数据校验包
    import Schema from 'async-validator'

    validator() {
        // 进行校验
        const rules = this.KForm.rules[this.prop]
        const value = this.KForm.model[this.prop]
        const descriptor = {
            [this.prop]: rules
        }
        const schema = new Schema(descriptor)
        schema.validate({
            [this.prop]: value
        }, errors => {
            if (errors) {
                this.errMessage = errors[0].message
                this.errStatus = true
            } else {
                this.errMessage = ''
                this.errStatus = false
            }
        })
    }
设计思想:
- from 绑定数据模型 添加校验规则
- formitem label prop 校验和显示错误
- input
provide / inject (opens new window) *
主要为高阶插件/组件库提供用例。并不推荐直接用于应用程序代码中
  // 父级组件
  provide() {
          return {
              someval: '来自app.vue'
          };
      },

      // 子组件注入 someval
      inject: ["someval"]
slot插槽路由传参
/page/123可是使用props:['id']拿this.id === 123命名视图 (opens new window)(使用 name 进行区分)
有时候想同时 (同级) 展示多个视图,而不是嵌套展示,例如创建一个布局,有
sidebar(侧导航) 和main(主内容) 两个视图,这个时候命名视图就派上用场了。你可以在界面中拥有多个单独命名的视图,而不是只有一个单独的出口。如果router-view没有设置名字,那么默认为default。
  <router-view class="view one"></router-view>
  <router-view class="view two" name="a"></router-view>
  <router-view class="view three" name="b"></router-view>
一个视图使用一个组件渲染,因此对于同个路由,多个视图就需要多个组件。确保正确使用 components 配置 (带上 s):
  const router = new VueRouter({
      routes: [{
          path: "/",
          components: {
              default: Foo,
              a: Bar,
              b: Baz
          }
      }]
  });
- 组件内的守卫
  export default {
      beforeRouteEnter(to, from, next) {
          // 在渲染该组件的对应路由被 confirm 前调用
          // 不!能! 获取组件实例 this
          // 因为当守卫执行前,组件实例还没有被创建
      },
      beforeRouteUpdate(to, from, next) {
          // 在当前路由改变,但该组件被复用时调用
          // 举例来说,对于一个带有动态参数的路径 /foo/:id 在 /foo/1 和 /foo/2 之间跳转的时候
          // 由于会渲染同样的FOO组件,因此组件实例会被复用,而这个钩子会在这个情况下被调用。
          // 可以访问组件实例 this
      },
      beforeRouteLeave(to, from, next) {
          // 导航离开该组件的对应路由时调用
          // 可以访问组件实例 this
          // 通常用来禁止用户在还未保存修改前突然离开。该导航可以用过next(false)来取消
      }
  };
vuex mapActions将两者进行映射 简化代码
你在组件中使用 this.$store.dispatch('xxx') 分发 action,或者使用 mapActions 辅助函数将组件的 methods 映射为 store.dispatch 调用(需要先在根节点注入 store ):
import {
    mapActions
} from "vuex";

export default {
    // ...
    methods: {
        ...mapActions([
            "increment", // 将 `this.increment()` 映射为 `this.$store.dispatch('increment')`

            // `mapActions` 也支持载荷:
            "incrementBy" // 将 `this.incrementBy(amount)` 映射为 `this.$store.dispatch('incrementBy', amount)`
        ]),
        ...mapActions({
            add: "increment" // 将 `this.add()` 映射为 `this.$store.dispatch('increment')`
        })
    }
};
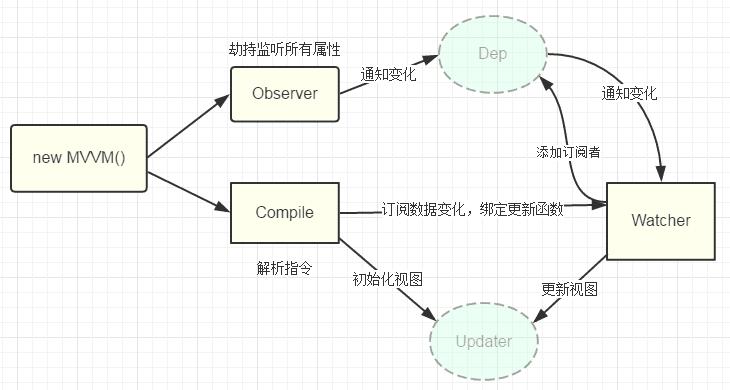
# Vue 源码解析
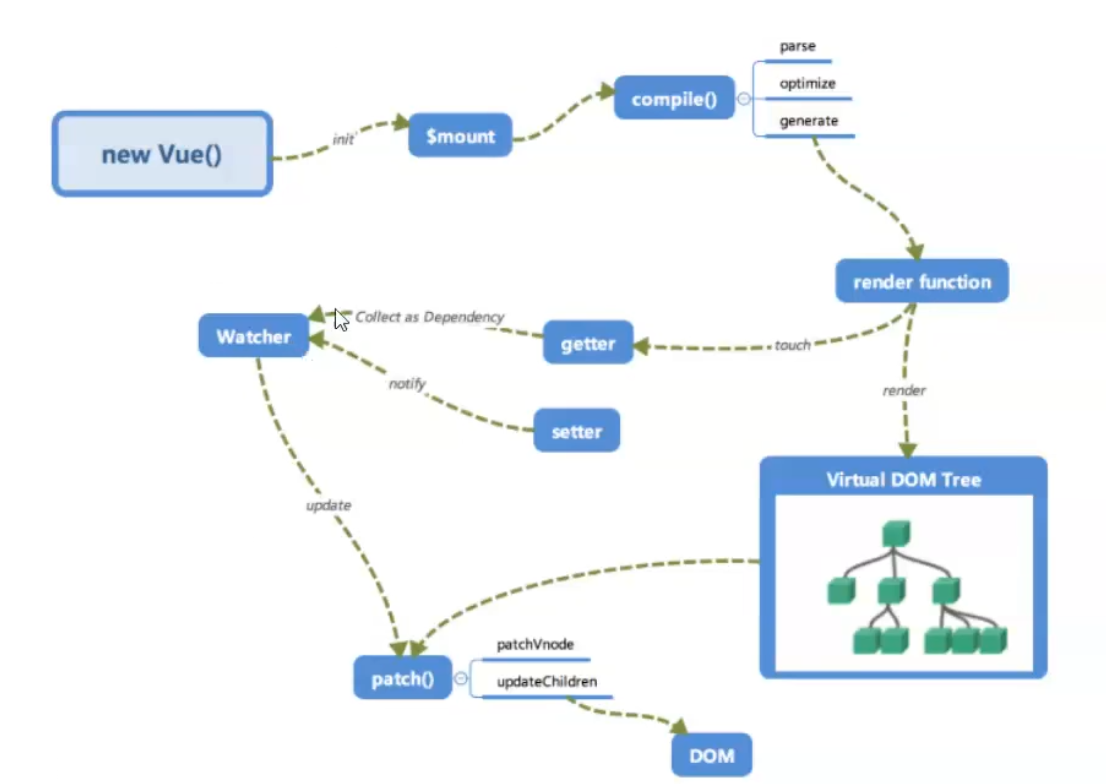
简化:
# Vue 项目实战
- 权限控制
// 路由守卫
router.beforeEach((to, from, next) => {
    if (to.meta.auth) {
        // 需要登录
        const token = localStorage.getItem("test-token");
        if (token) {
            next();
        } else {
            next({
                path: "/login",
                query: {
                    redirect: to.path
                }
            });
        }
    } else {
        next();
    }
});
// 用户拦截请求和响应

import axios from "axios";

export default function(vm) {
    // 设置请求拦截器
    axios.interceptors.request.use(config => {
        // 获取token
        const token = localStorage.getItem("token");
        if (token) {
            // 如果存在令牌这添加token请求头
            config.headers.Authorization = "Bearer " + token;
        }
        return config;
    });

    // 响应拦截器
    // 参数1表示成功响应
    // 这里只关心失败响应
    axios.interceptors.response.use(null, err => {
        if (err.response.status === 401) {
            // 没有登录或者令牌过期
            // 清空vuex和localstorage
            vm.$store.dispatch("logout");
            // 跳转login
            vm.$router.push("/login");
        }
        return Promise.reject(err);
    });
}
const Koa = require("koa");
const Router = require("koa-router");
// 生成令牌、验证令牌
const jwt = require("jsonwebtoken");
const jwtAuth = require("koa-jwt");

// 生成数字签名的秘钥
const secret = "it's a secret";

const app = new Koa();
const router = new Router();

router.get("/api/login", async ctx => {
    const {
        username,
        passwd
    } = ctx.query;
    console.log(username, passwd);

    if (username == "kaikeba" && passwd == "123") {
        // 生成令牌
        const token = jwt.sign({
                data: {
                    name: "kaikeba"
                }, // 用户信息数据
                exp: Math.floor(Date.now() / 1000) + 60 * 60 // 过期时间
            },
            secret
        );
        ctx.body = {
            code: 1,
            token
        };
    } else {
        ctx.status = 401;
        ctx.body = {
            code: 0,
            message: "用户名或者密码错误"
        };
    }
});

router.get("/api/userinfo", jwtAuth({
    secret
}), async ctx => {
    ctx.body = {
        code: 1,
        data: {
            name: "jerry",
            age: 20
        }
    };
});
app.use(router.routes());
app.listen(3000);
bearer token
Authorization: Bearer
<token>jwt
head.payload.hash
head:type, alr
payload:josn
hash
# Axios模块
# 安装
yarn add axios
# 封装引入
1、分离请求地址配置 src\config\AjaxPath.js
// 通过环境变量判断
const BASEURL =
    process.env.NODE_ENV === 'development' ?
    '/data/' :
    'http://xxx.xxx.xxx.xxx:xxxx/xxx'

// ajax请求地址
const AJAX_PATH = {
    getNavMenu: BASEURL + 'NavMenu', // 获取权限菜单信息
    getUserInfo: BASEURL + 'UserInfo', //获取用户信息
}

export default AJAX_PATH
2、封装axios模块 src\utils\http.js
import axios from 'axios'
import router from '../router/index.js'

const service = axios.create({
    timeout: 1000 * 30,
    withCredentials: true,
    headers: {
        'Content-Type': 'application/json; charset=utf-8',
        'Access-Control-Allow-Origin': '*'
    }
})

/*
 * 请求拦截
 */
service.interceptors.request.use(
    config => {
        // 在请求头添加与服务端协商好的token字段
        config.headers['token'] = JSON.parse(localStorage.getItem('xxx-token'))
        return config
    },
    error => {
        return Promise.reject(error)
    }
)

/**
 * 响应拦截
 */
service.interceptors.response.use(
    response => {
        if (response.data && response.data.code === 401) {
            // 401, token失效
            localStorage.removeItem('xxxx-token')
            router.push({
                name: 'Login'
            })
        }
        if (response.data && response.data.code === 302) {
            router.push('/')
        }
        return response
    },
    error => {
        if (error.status === 404) {
            router.push({
                name: '404'
            })
        }
        return Promise.reject(error)
    }
)

export default service
3、在Vue中引入 src\main.js
import Http from './utils/http.js'
Vue.prototype.$http = Http